
3620 news and ARP 2600
vintage connectivity
Dear community!
We hope you’re all doing great. The purpose of this newsletter is to keep you informed about the latest news regarding the Antonus 3620. We know very well that it’s been a long journey, and that’s why we want to thank you for supporting this project—the biggest in Antonus’s history.
We’re very proud of the final product and can’t wait for you to have it in your homes. We want to share all the latest updates with you, keep you informed about delivery dates, and provide other interesting details.
We’re already finalizing the first units for delivery to their respective Patrons; deliveries will begin in September. First, we’ll start by delivering the units to the Patrons, which will take place between September 2026 and January 2027. Once all units for the Patrons have been delivered, we’ll begin delivering units for regular orders, which will take place during the first six months of 2027.
Since we’ve received several questions about the Interface cable, we’d like to clarify a few points to avoid any confusion.
There are two ways to connect the Antonus 3620 keyboard to the vintage ARP 2600.
As every user knows, the ARP 2600 has a 6-pin Cinch Jones connector for the keyboard on its left side. This connector is used to connect the original ARP 3604 or 3620 keyboard. Through this connection, the keyboard can send the standardized CV signal to the 2600’s three VCOs as well as to the VCF for keyboard tracking. Similarly, this connection receives the GATE+Trigger signals needed to properly trigger the ARP 2600’s envelopes. At the same time, one of the pins on the Cinch Jones connector provides power to operate the ARP 3604 or 3620, since these keyboards do not have their own power supply and rely on the ARP 2600’s power.
On the ARP 3604 and 3620 keyboards, there was no way to use the main CV and Gate signals other than via the Cinch Jones cable, since the front panel of the keyboards did not include a mini-jack output. Only the ARP 3620 had an Upper CV output available on the panel, but that could only be used to control the pitch of the second voice in duophonic mode, so you still couldn’t use the main (lower) CV or the trigger signal for the envelopes.
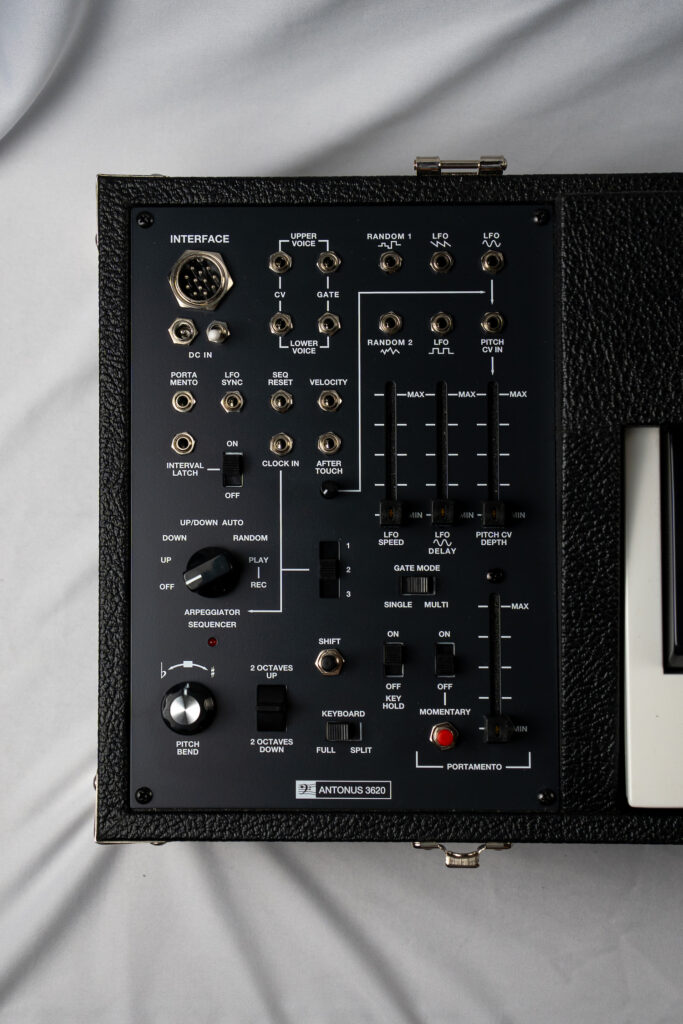
With the Antonus 3620, things are different, as there are several differences. For one thing, the Antonus 3620 has its own power connection, making it a completely independent and self-contained device. Additionally, its panel features patch connections for Lower and Upper CV, as well as their respective GATE signals. Although the Antonus lacks a TRIGGER output, the way the GATE signal works means it isn’t necessary to use two signals to optimally trigger the ARP envelopes. This is because, with current technology, we can replicate the same response using just one signal—something that was more difficult with early 1970s technology. That’s why we can use the Antonus 3620 with the ARP 2600 without needing the Cinch Jones interface.
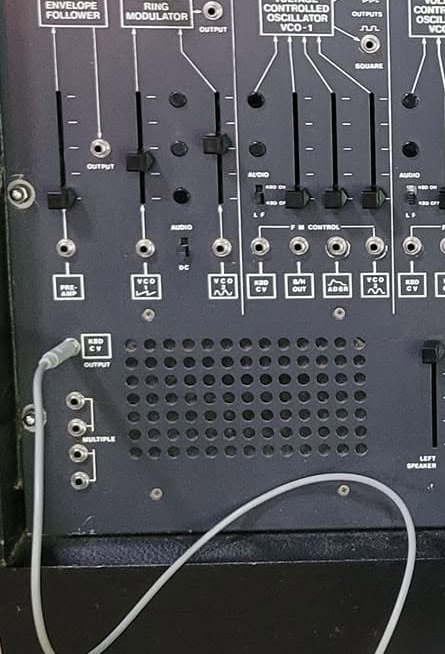
To do this, we need to connect the Lower CV signal to control the VCOs and the VCF. When there’s no signal present at the Cinch Jones connector, we can use the KBD CV output on the ARP 2600’s front panel as an input that connects us to the entire bus. It’s important to note that you shouldn’t have any other keyboard or device connected to the Cinch Jones jack, since otherwise control signals will be added in unpredictable ways.
You won’t break anything, but the result will be pretty crazy in terms of precision. This is because that connection point is actually a CV control output from the keyboard (which comes from the Cinch Jones jack), but since nothing is connected to the Cinch Jones jack, it can act as an input.
Another way to connect your 2600 via CV is by using a multiple—either the one built into the ARP 2600 right below the aforementioned KBD CV connector, or an external multiple.
To do this, connect the Lower CV output of your Antonus 2600 to one port on the patchbay and connect the remaining ports to their respective control destinations. If you use the ARP 2600’s front-panel patchbay, the drawback is that you have one “input” for the Lower CV and three “outputs,” so if you want to control all three VCOs and the VCF tracking, one will remain uncontrolled. To solve this, we’d need to use an external multiple with more than four ports. Alternatively, we could use the Upper CV output of the Antonus 3620 to control the VCF’s tracking—which is useful because the VCF would have higher-note tracking, potentially making it more musical than lower-note tracking. Another option is to use the filter without keyboard tracking. There are several options and solutions for this.
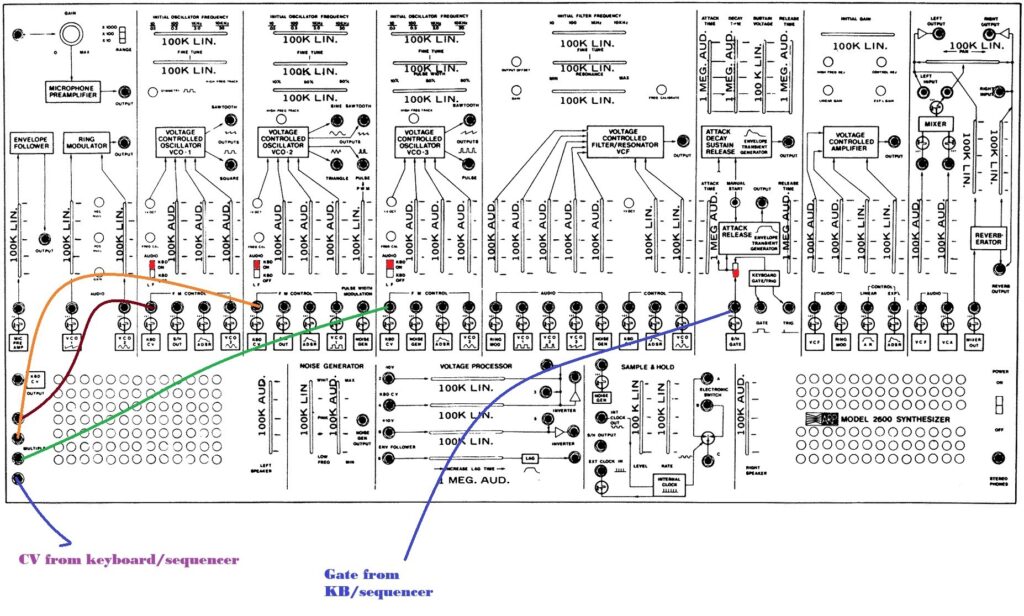
With that, you’ve now established basic pitch CV connectivity, so all that’s left is to connect the trigger signal for the envelopes. In this case, we’ll use the Lower Gate output on the Antonus 3620 and connect it to the envelope trigger input on the front panel (which is somewhat confusingly labeled “S/H GATE”). Keep in mind that to use this control input, you’ll need to set the corresponding selector switch to the lower position so that the envelopes are triggered by this input rather than the one coming in via the Cinch Jones connector.
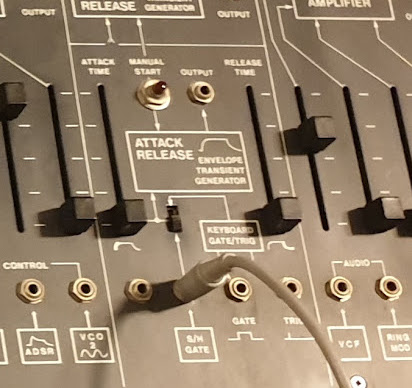
This way, we’ll be able to achieve basic, classic connectivity using our Antonus 3620 without needing a Cinch Jones adapter. Additionally, with the Antonus 3620’s Upper CV and Gate outputs, we can create more complex patches.
However, if for any reason the user wishes to use the ARP2600’s Cinch Jones input with the Antonus 3620, a special adapter will be required for that purpose. The Antonus 3620’s interface connector provides the necessary signals for control via Cinch Jones connectivity, but obviously the physical connections will need to be adapted.
Here is a wiring diagram for the Antonus 3620´s interface connector:
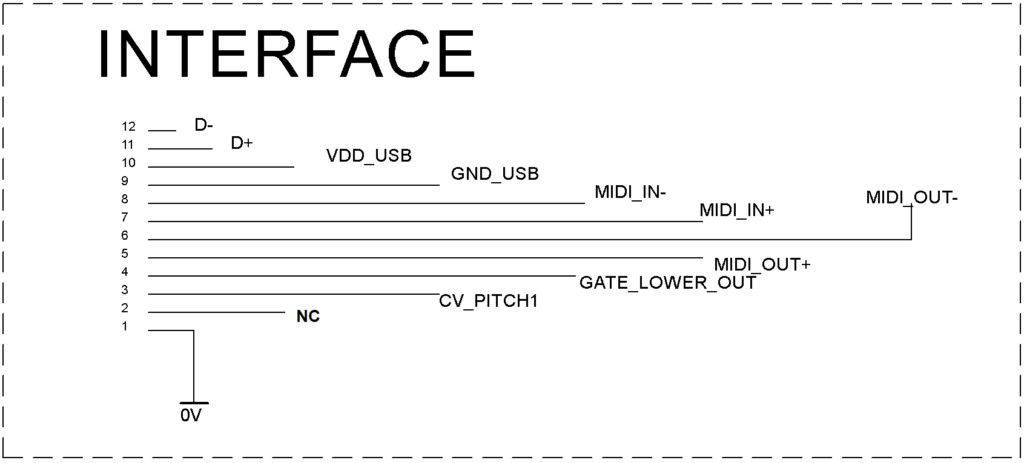
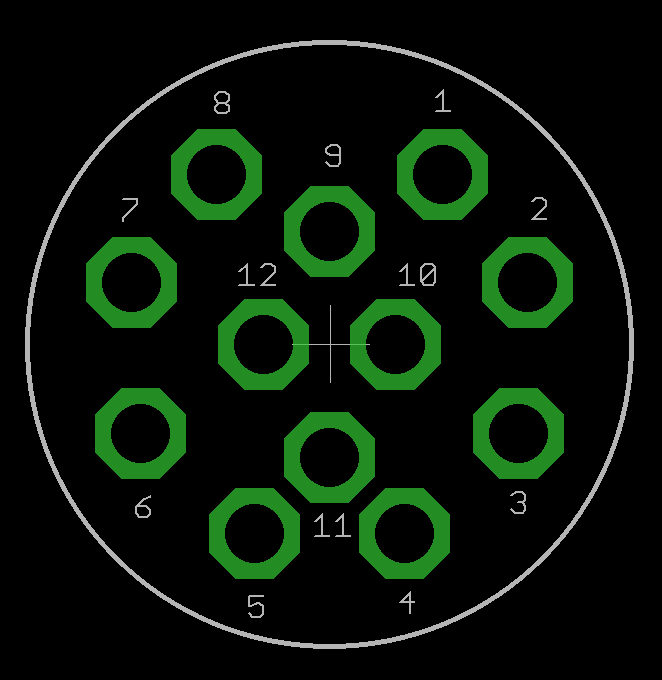
The standard cable includes, in a bundle, 2 DIN 5 MIDI in and out cables, as well as a female micro-USB cable.
Making a Cinch Jones cable that shares space within the connector is very complex because the neck of the GX20 connector cannot accommodate that many cables, each with its own plastic insulation. That’s why we’ve found that the most efficient way to achieve all that connectivity is to use an external breakout box.
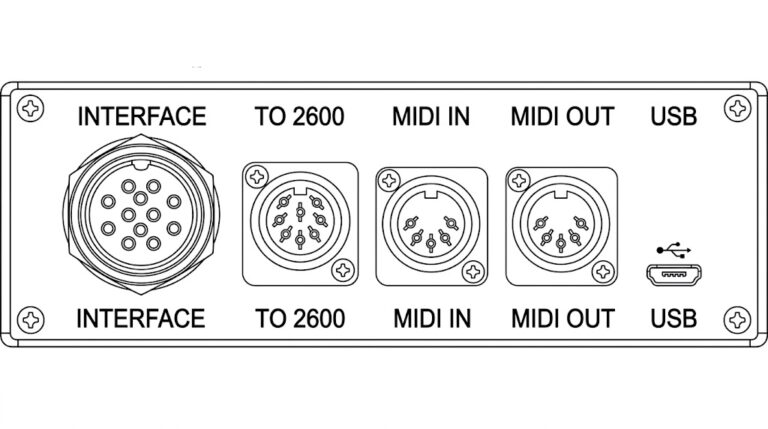
This box connects via a 12-pin female-to-female GX20 cable, and the box itself provides full connectivity. The box includes DIN 5 connectors for MIDI IN and MIDI OUT, a USB connection, and a DIN-8 connector, which will be used via a Cinch Jones to DIN-8 cable.
So, for this specific setup, the accessories are:
- Breakout box
- GX20 “Interface” cable to connect the Antonus 3620 to the breakout box
- Cinch Jones -6 to MIDI DIN 8 cable to connect the ARP2600 to the breakout box
Optional: MIDI DIN 5 and Micro USB cables
Important Info
- This breakout box option, along with a special Cinch Jones 6-pin to DIN 8- cable, has an additional cost of €90.
- This box can be ordered at the time of purchase or at any later time.
As explained, the box isn’t strictly necessary to use the Antonus 3620 with the vintage ARP2600, but it adds a level of convenience for those who, for whatever reason, prefer to use the 6-pin Cinch Jones interface of their vintage ARP2600.
This box will not provide any additional functionality if used with equipment other than the vintage ARP2600.
Please contact us with if you have any questions.